How to Remove Acrylic Nails at Home Safely
Learn how to remove acrylic nails at home safely with easy step-by-step methods. Say goodbye to salon visits and hello to DIY nail freedom!

Well, here's the thing about acrylic nails, they're absolutely gorgeous when you first get 'em done, but boy oh boy, when it's time to take them off? That's when the real fun begins! If you've been sporting those fancy fingertips for a while now and they're starting to look a bit worse for wear, you're probably wondering about how to remove acrylic nails at home safely. Trust me, I've been there, staring at my grown-out nails thinking, "There's gotta be a better way than ripping these bad boys off!"
You know what? There absolutely is! Gone are the days when you'd have to book another expensive salon appointment just to get your natural nails back. With the right tools and a little patience (okay, maybe a lot of patience), you can master the art of acrylic removal right from your couch. So grab your favorite Netflix series, 'cause we're about to embark on a nail transformation journey that'll save your wallet and your fingertips!
Why Learning How to Remove Acrylic Nails at Home Safely Matters
Let's face it, we've all been tempted to just peel those suckers off when they start lifting. But hold your horses! Ripping off acrylics is like trying to remove a band-aid that's been superglued to your skin, it's gonna hurt, and you'll probably take some of your natural nail with it. Ouch!
Learning the proper removal technique isn't just about avoiding pain, though that's definitely a plus. It's about:
• Preserving your natural nail health • Avoiding infections from damaged nail beds • Saving money on salon removal fees • Having the freedom to change your nail game whenever you want • Preventing those nasty paper-thin nails that make you wince every time you touch something
The Essential Tools You'll Need for Safe Removal
Before diving into the nitty-gritty of how to remove acrylic nails at home safely, let's talk tools. You wouldn't try to build a house without a hammer, right? Same goes for nail removal!
Your DIY Nail Removal Arsenal:
100% Pure Acetone (Not your regular nail polish remover, folks!)
Nail file or e-file (The coarser, the better)
Cotton balls or pads (Stock up, you'll need plenty)
Aluminum foil (Time to raid the kitchen!)
Cuticle pusher or orange stick
Nail buffer
Cuticle oil or moisturizer
A bowl (If you're going the soaking route)
Nail clippers
Timer (Your phone works perfectly)

Method 1: The Classic Acetone Soak Technique
Alright, let's start with the OG method that nail techs have been using since the dawn of acrylics. This technique is tried and true, though it does require some serious patience.
Step-by-Step Soaking Process:
First things first, clip those nails down as short as you comfortably can. The less acrylic you have to dissolve, the faster this whole process goes. Now, here's where the fun begins!
File the top layer of your acrylics using a coarse nail file. You're not trying to file them completely off, just roughing up that shiny top coat so the acetone can work its magic. Think of it like sanding wood before painting, you need that texture for better absorption.
Pour your acetone into a bowl, making sure it's deep enough to cover your nails completely. Some people like to warm it slightly (and by slightly, I mean lukewarm, not hot!), as this can speed up the process. Whatever you do, don't microwave acetone, that's a disaster waiting to happen!
Now comes the waiting game. Dip your fingers in the acetone and set that timer for 30-40 minutes. Yeah, I know, it's a long time! This is where that Netflix series comes in handy. Every 10 minutes or so, gently try to push the softened acrylic off with your cuticle pusher. If it's not budging easily, back in the acetone it goes!
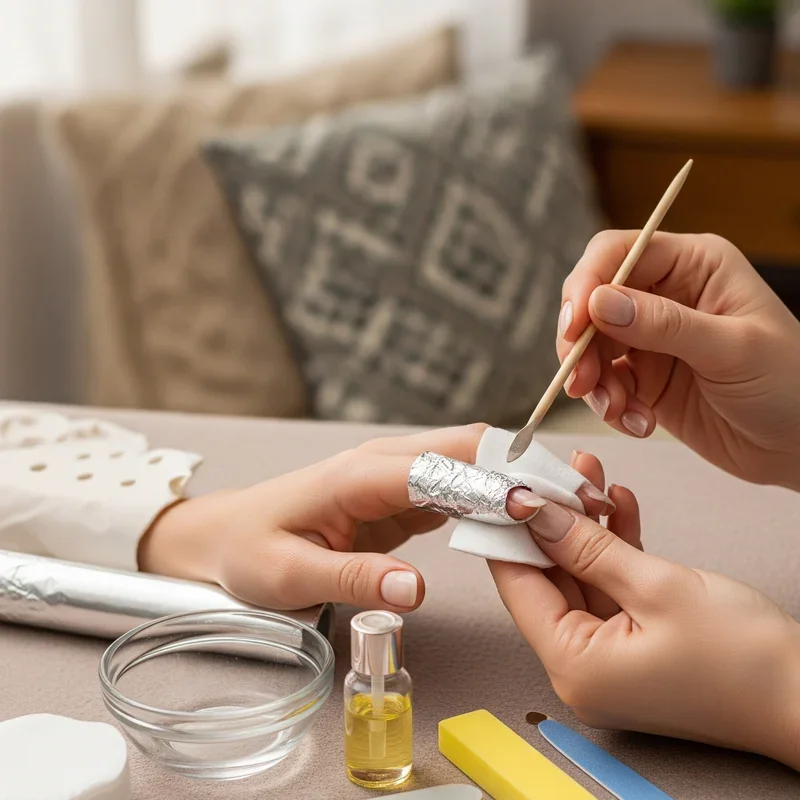
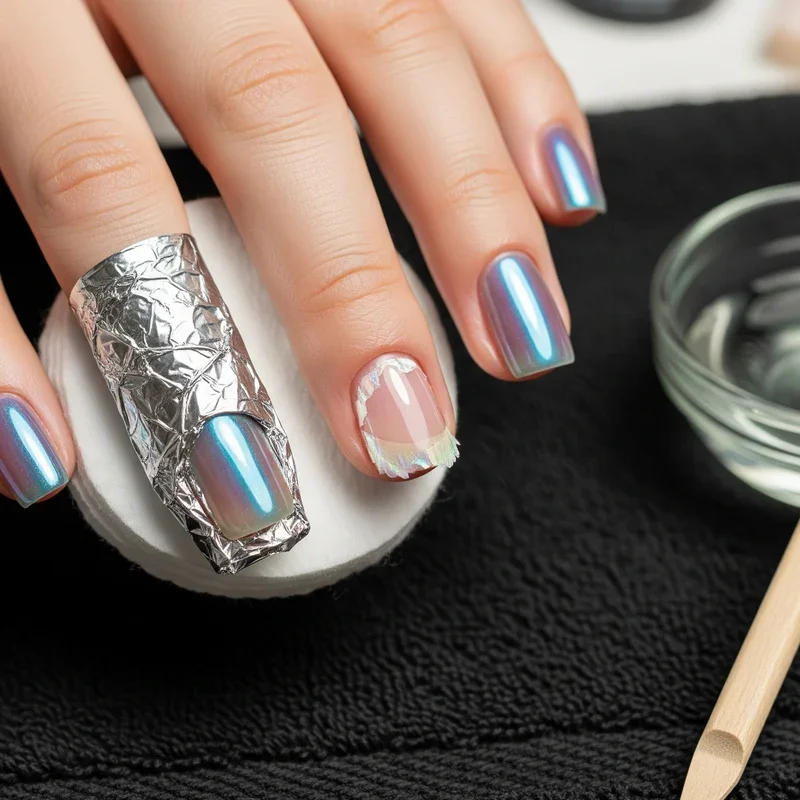
Method 2: The Aluminum Foil Wrap Technique
If sitting with your fingers in a bowl for 40 minutes sounds about as appealing as watching paint dry, this method's for you! It's basically the same principle but with more mobility.
The Wrap and Wait Approach:
After filing and clipping your nails, soak cotton balls in acetone until they're thoroughly saturated. Place one on each nail, making sure the entire acrylic surface is covered. Here's where it gets a bit tricky, you'll need to wrap each finger in aluminum foil to keep those cotton balls in place.
Walking around looking like you've got little aluminum sausages for fingers? Yep, that's the look we're going for! But hey, at least you can still use your phone (sort of). Leave these on for about 30 minutes, then check one nail to see how things are progressing. The acrylic should be getting gooey and easy to push off.
Method 3: The Dental Floss Method (For the Brave!)
Okay, this one's not for the faint of heart, but if you've got a friend willing to help and your acrylics are already lifting quite a bit, this can be a quicker option.
Partner Up for Removal:
You'll need someone else for this technique, 'cause doing it yourself is next to impossible. Have your helper slide dental floss under the lifted edge of your acrylic nail. Using a sawing motion, they'll work the floss under the acrylic toward the cuticle.
Fair warning: this method can be uncomfortable and shouldn't be forced if there's resistance. If it's not working smoothly, switch to one of the acetone methods instead. Your natural nails will thank you!

Post-Removal Care: Show Your Natural Nails Some Love
Phew! You've successfully removed those acrylics, but don't celebrate just yet. Your natural nails have been through the wringer and need some serious TLC.
The Recovery Process:
Start by gently buffing away any remaining acrylic residue. Your nails might look pretty rough right now, and that's totally normal! They've been covered up for weeks or months, so they need time to breathe and recover.
Shape your natural nails with a file, keeping them short while they regain strength. Trust me, trying to grow them out immediately is just asking for breaks and tears. Apply a strengthening base coat if you've got one handy.
Now here's the important part: moisturize, moisturize, moisturize! Your nails and cuticles are probably drier than the Sahara right now. Slather on that cuticle oil and hand cream like your life depends on it. Make this a daily habit, and your nails will bounce back much faster.
Common Mistakes to Avoid When Removing Acrylics
Learning from others' mistakes is way better than making them yourself, am I right? Here are the biggies to steer clear of:
• Forcing or ripping off acrylics (Your nail beds will never forgive you) • Using non-acetone polish remover (It won't work, period) • Rushing the process (Patience is a virtue, especially here) • Neglecting aftercare (Those nails need nurturing!) • Immediately applying new acrylics (Give your nails a breather)
When to Call in the Pros
Sometimes, despite our best DIY efforts, it's better to leave it to the professionals. If you notice any of these red flags, book that salon appointment:
• Severe lifting with possible infection underneath • Extreme pain during removal attempts • Bleeding or significant damage to the nail bed • Acrylics that just won't budge after multiple attempts
Natural Nail Recovery Timeline
Wondering when your nails will look normal again? Here's a rough timeline:
Week 1-2: Nails look thin and possibly damaged Week 3-4: New growth starts becoming visible Week 5-8: Nails begin regaining strength Week 9-12: Most damage has grown out
Remember, everyone's nails grow at different rates, so don't stress if yours are taking their sweet time!

Alternative Methods and Professional Tips
Some nail techs swear by e-files for removal, and while they're super efficient, they require skill to avoid damage. If you're considering this route, maybe practice on a willing friend first (kidding, sort of).
Another pro tip? Some people find that applying cuticle oil before the acetone soak helps protect the surrounding skin. It's worth a shot if you've got sensitive skin!
Conclusion
So there you have it, folks! You're now armed with everything you need to know about removing acrylic nails safely at home. Whether you choose the soak method, the foil wrap technique, or brave the dental floss approach, remember that patience and gentle handling are your best friends in this process. Your natural nails might need some time to recover, but with proper care and a little TLC, they'll be back to their healthy, happy selves before you know it!
Read next: 15 Simple Nail Design Ideas for Everyday Style
Frequently Asked Questions
Q1: How long does acetone take to remove acrylics?
A: Usually 30-40 minutes with pure acetone for complete removal.
Q2: Can I use regular nail polish remover instead?
A: No, you need 100% acetone for effective acrylic removal.
Q3: Will removing acrylics damage my natural nails?
A: Gentle removal minimizes damage, but some thinning is normal initially.
Q4: How often should I take breaks from acrylics?
A: Every 3-4 months gives your natural nails recovery time.
Q5: What's the fastest way to strengthen nails post-removal?
A: Daily cuticle oil application and nail strengthening treatments work best.
Stay up to date with our latest ideas!