15 Halloween Toe Nail Ideas for Spooky Stylish Looks
Transform your toes into Halloween masterpieces with 15 spooky nail art designs perfect for October celebrations and costume parties
Who says your fingers should have all the Halloween fun? Your toes deserve some spooky love too, especially when you're rocking those open-toed shoes at autumn parties or showing off your pedicure in cozy Halloween socks. October brings the perfect excuse to experiment with nail art that might be too bold for everyday wear. Whether you're heading to a costume party, trick-or-treating with the kids, or just embracing the October vibes, these toe nail designs will add that extra touch of festive flair to your look. From subtle spider webs to bold bloody drips, there's something here for every level of nail art expertise. Your pedicure can last weeks longer than a manicure, making it the perfect canvas for intricate Halloween designs. Ready to give your piggies a frightfully fabulous makeover that'll have everyone asking where you got them done.
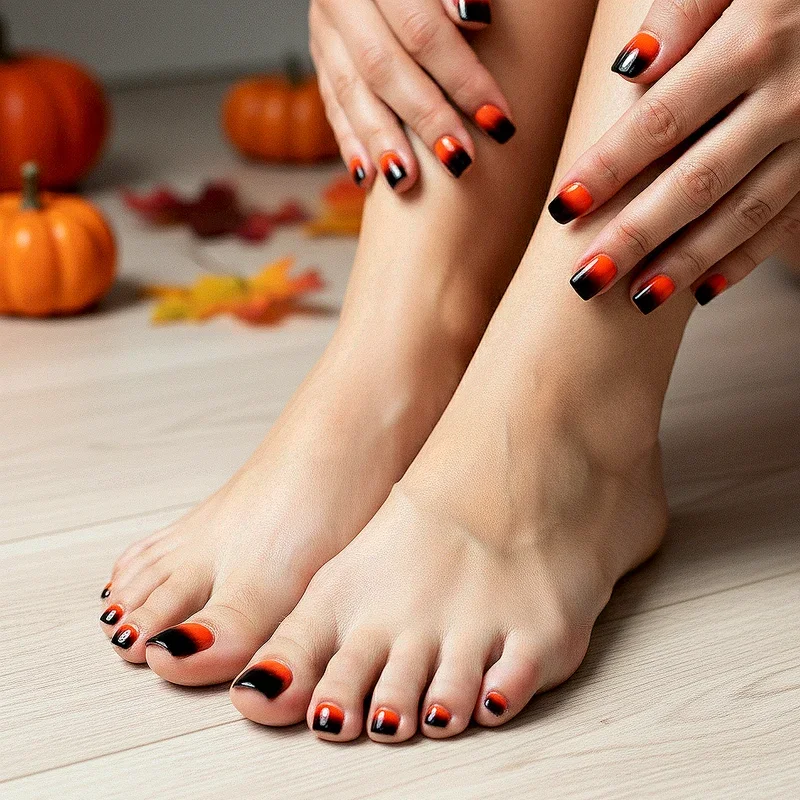
1. Classic Orange and Black Ombre
Nothing screams Halloween quite like the classic orange and black color combination, right? This ombre design creates a stunning gradient effect that transitions from deep midnight black at the tips to vibrant pumpkin orange at the base. You'll need a makeup sponge to dab and blend the colors seamlessly, creating that perfect fade that looks professionally done. The beauty of this design lies in its simplicity yet striking appearance. Add a glossy top coat to make those colors pop even more, and maybe throw in some orange glitter on your big toe for extra sparkle. This versatile look works perfectly whether you're wearing sandals to a Halloween brunch or peeping through your costume's open-toed shoes at night.
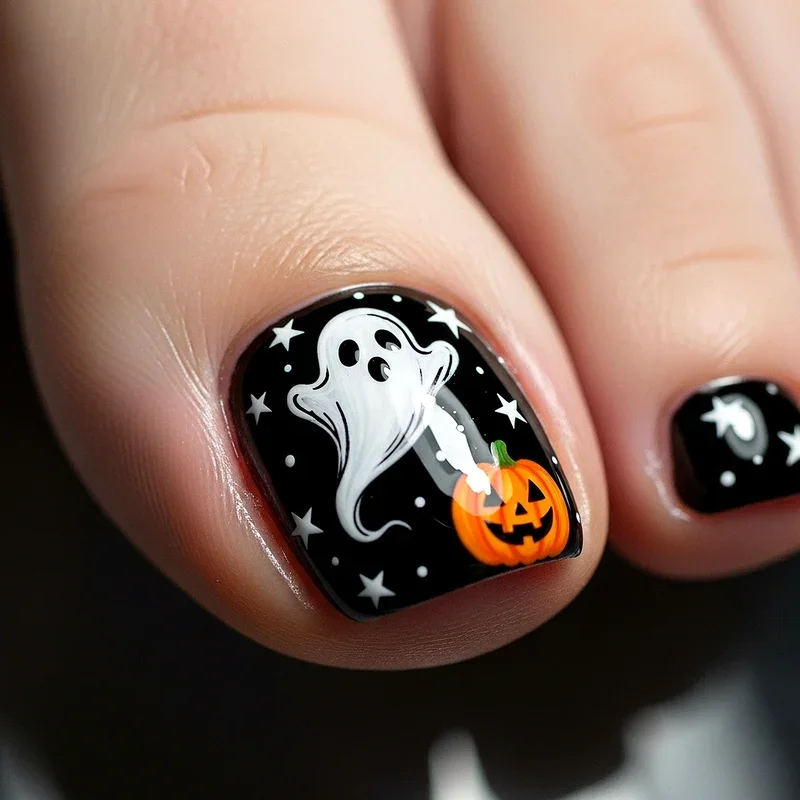
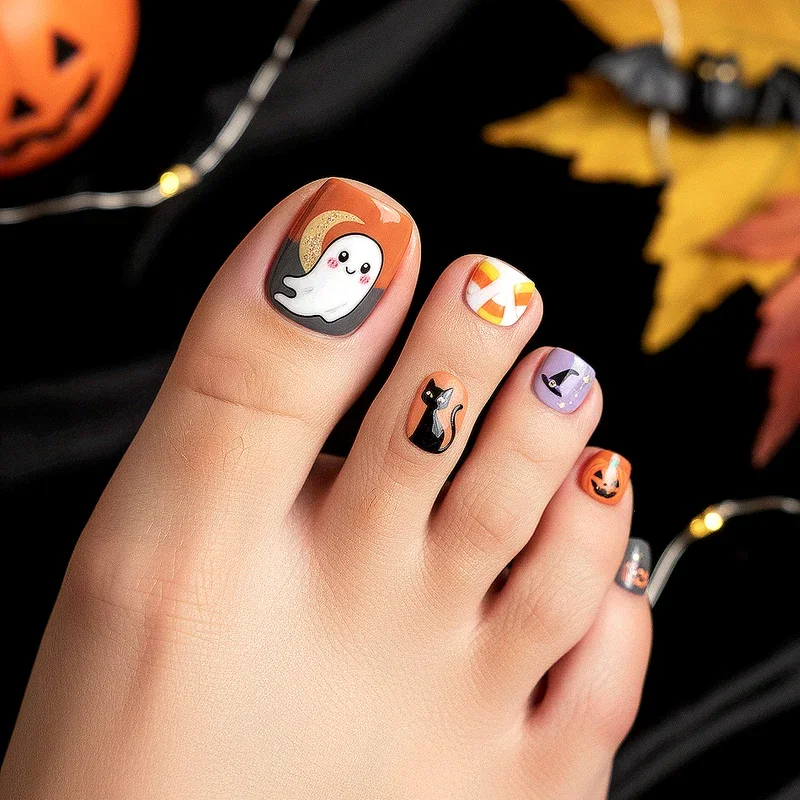
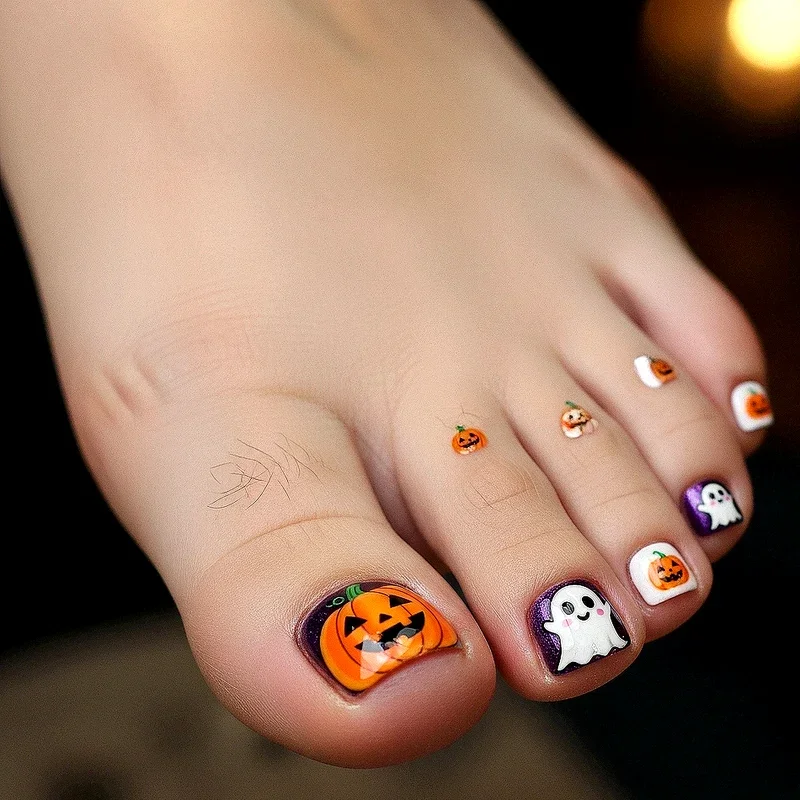
2. Tiny Ghost Parade
Transform your toes into a haunted haven with adorable mini ghosts floating across each nail. Start with a crisp white base coat, then use a thin brush or dotting tool to create small ghost shapes with wavy bottoms that give them that ethereal floating effect. Two tiny black dots for eyes and you've got yourself the cutest spooky spirits ever. What makes this design especially charming is how you can give each ghost a different expression or position, creating a whole ghostly family across your ten toes. Consider adding a glow-in-the-dark top coat for an extra surprise when the lights go out. This playful design strikes the perfect balance between spooky and sweet, making it ideal for Halloween lovers.
3. Spider Web French Tips
Give the classic French manicure a Halloween twist by replacing those white tips with intricate spider webs. Start with a nude or pale pink base, then paint black tips on each toe before the real artistry begins. Using a thin nail art brush or even a toothpick, draw delicate web patterns starting from one corner and radiating outward. The key is keeping your hand steady and working quickly while the polish is still slightly wet for those fine, connected lines. Add a tiny rhinestone spider on your big toe for that extra wow factor. This sophisticated take on Halloween nail art proves you can be festive without going overboard, perfect for office Halloween celebrations where elegance matters.

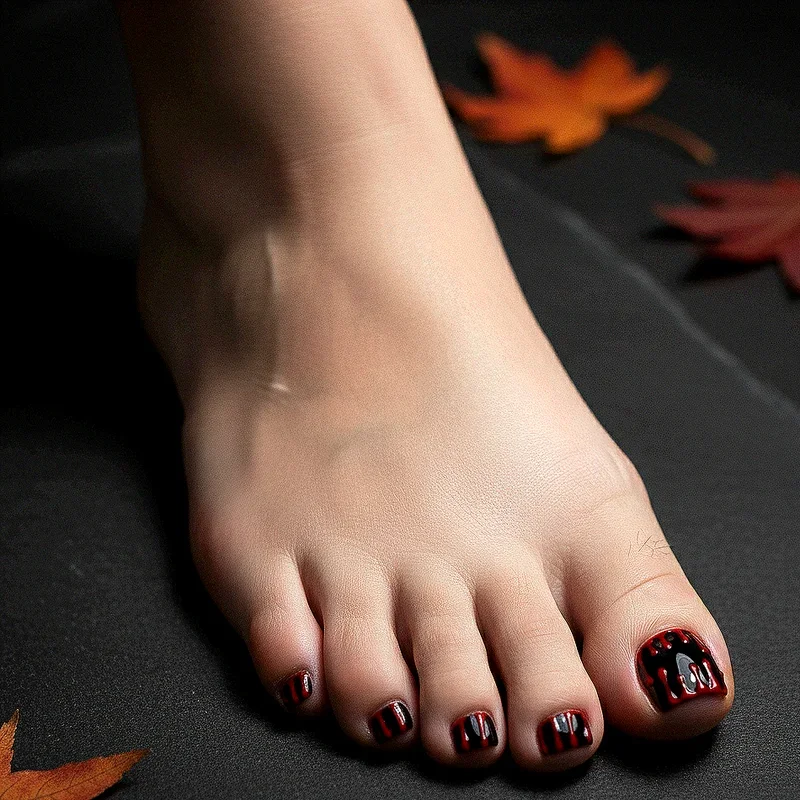
4. Bloody Drip Design
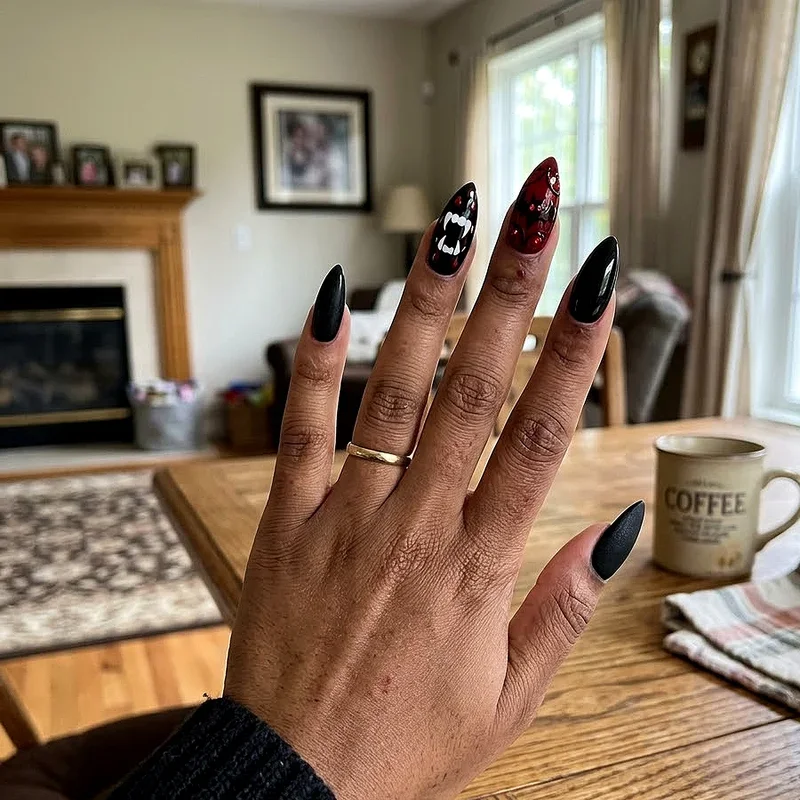
Ready to turn heads with something deliciously gruesome? The bloody drip design creates the illusion of fresh blood dripping down from your nail tips, perfect for vampire costumes or horror movie marathons. Start with a deep burgundy or true red base, then use a slightly darker shade to create realistic drip patterns from the tips. The secret is varying the length and thickness of each drip to make it look naturally chaotic. Adding a glossy top coat enhances that wet blood effect that'll have everyone doing double takes. For extra drama, consider using a matte black base with glossy red drips for more dramatic contrast. This bold design isn't for the faint of heart but makes a statement.
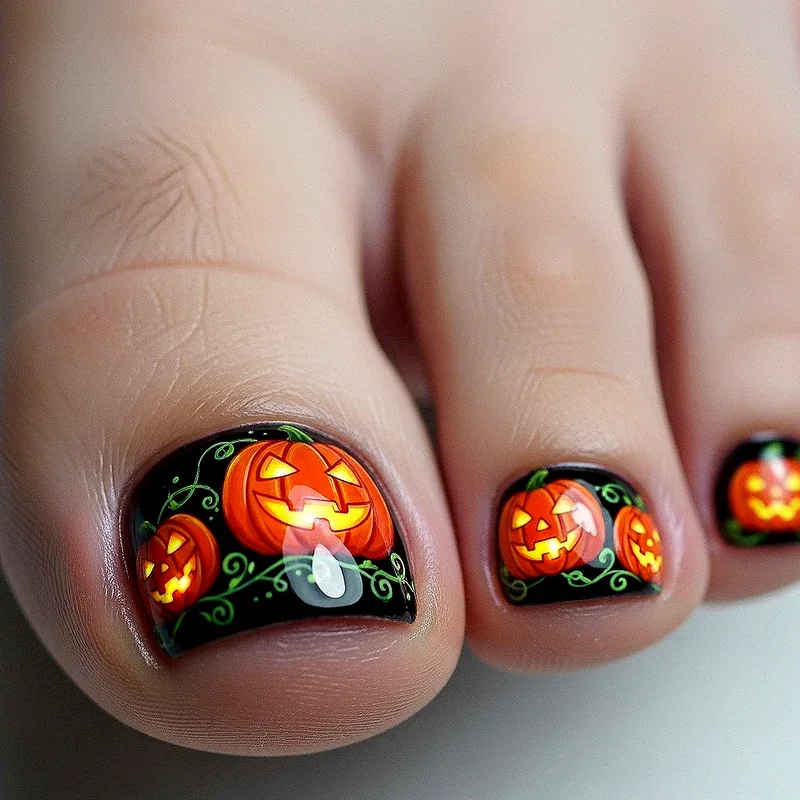
5. Miniature Jack-o'-Lanterns
Bring the pumpkin patch to your pedicure with these adorable miniature jack-o'-lantern designs that capture the essence of Halloween perfectly. Paint your nails bright orange as the base, then use black polish to create those iconic carved faces with triangular eyes and zigzag smiles. Each toe can feature a different expression, from menacing grins to surprised looks, creating a whole pumpkin family. Add tiny green stems at the base of each nail using a dotting tool for that authentic pumpkin look. The challenge here is working with the smaller canvas of toe nails, but that's what makes these mini masterpieces so impressive. Consider using a brown accent line at the base to represent natural pumpkin ridges.
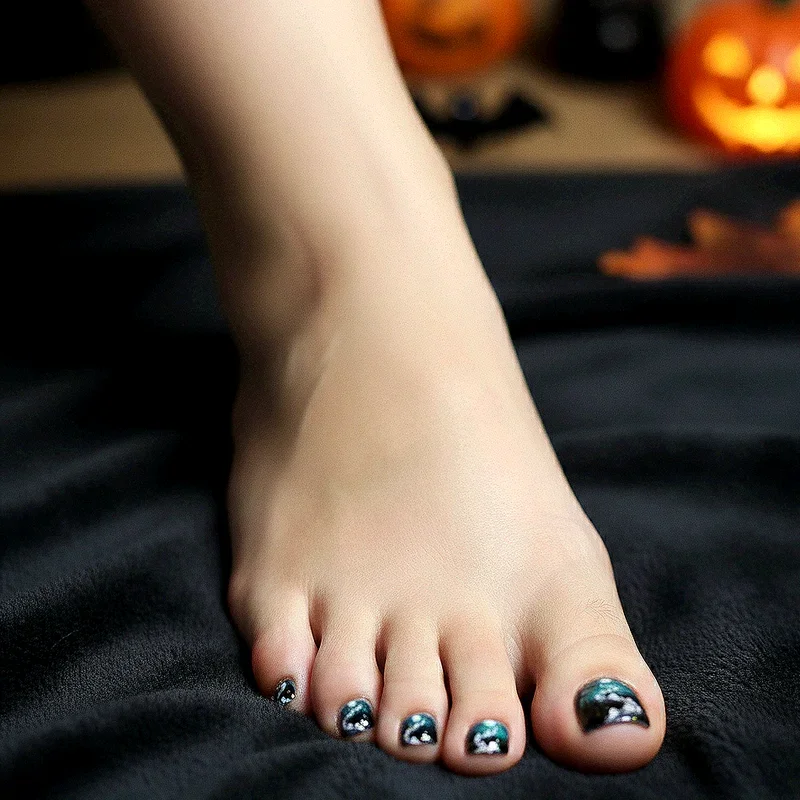
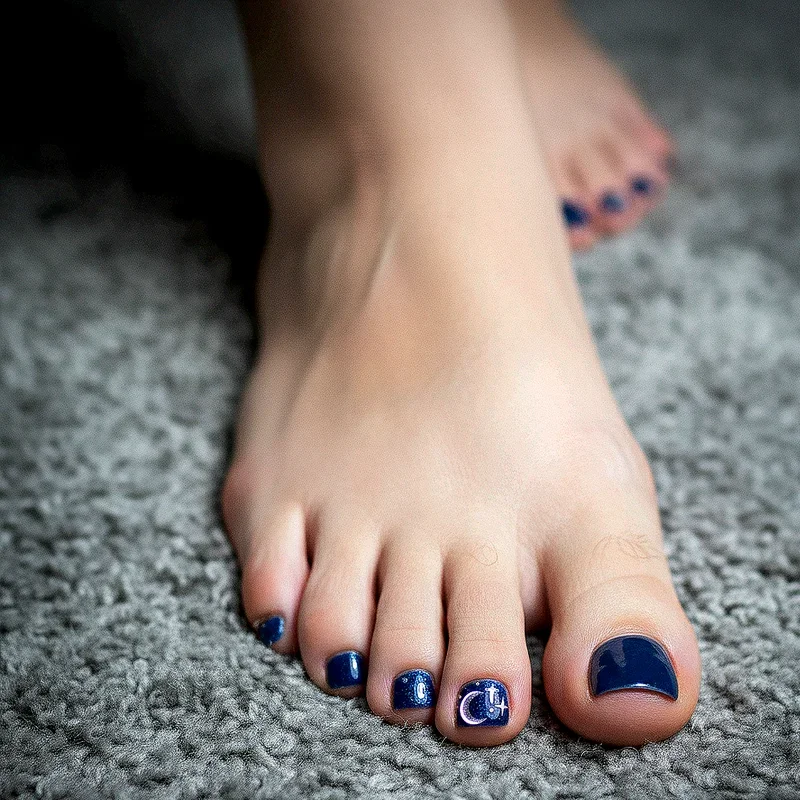
6. Witchy Moon and Stars
Channel your inner witch with this mystical celestial design that combines crescent moons, twinkling stars, and deep midnight blues for a bewitching pedicure. Start with a dark navy or purple base that mimics the night sky, then use metallic gold or silver polish to paint delicate crescent moons and star patterns. The beauty of this design is its versatility since you can arrange the celestial elements differently on each toe, creating a unique constellation across your feet. Add some holographic glitter to represent stardust or use glow-in-the-dark polish for the moon and stars to create magical effects in low light. This enchanting design works beautifully for witch costumes or mystical Halloween lovers.
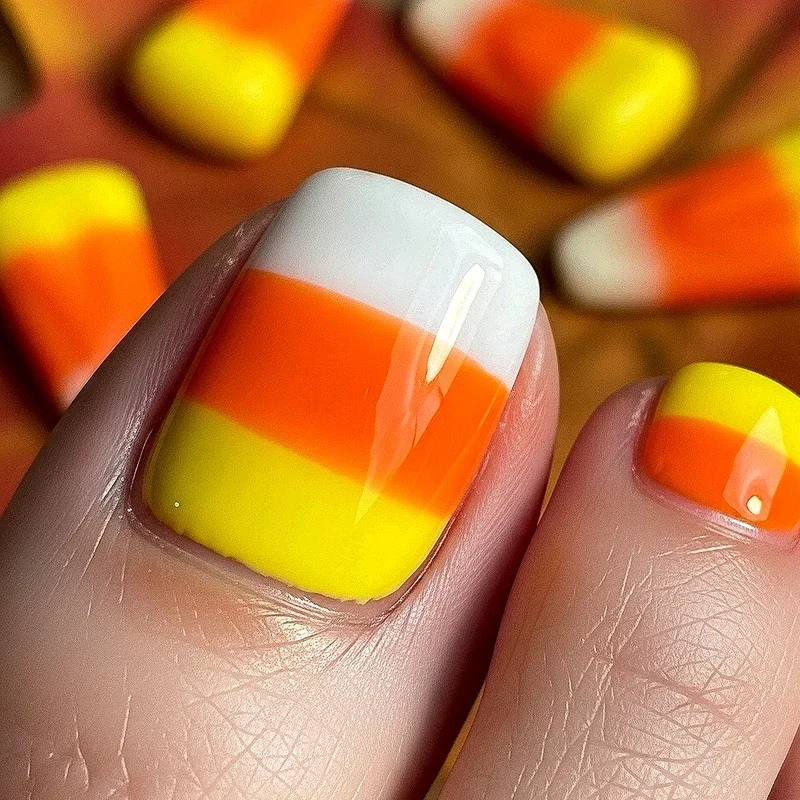
7. Candy Corn Stripes
Sweet tooths rejoice because this candy corn inspired design brings everyone's favorite controversial Halloween treat straight to your toes. Create the classic tri-color pattern with white tips, orange middles, and yellow bases, just like those triangular candies we either love or hate. The trick is getting those lines perfectly straight and evenly spaced, which you can achieve using thin striping tape or nail guides. What makes this design particularly fun is how you can play with the orientation on different toes, having some pointing up and others sideways for visual interest. For a modern twist, try using glitter versions of these colors or add a matte top coat for sophistication. This nostalgic design instantly evokes Halloween.
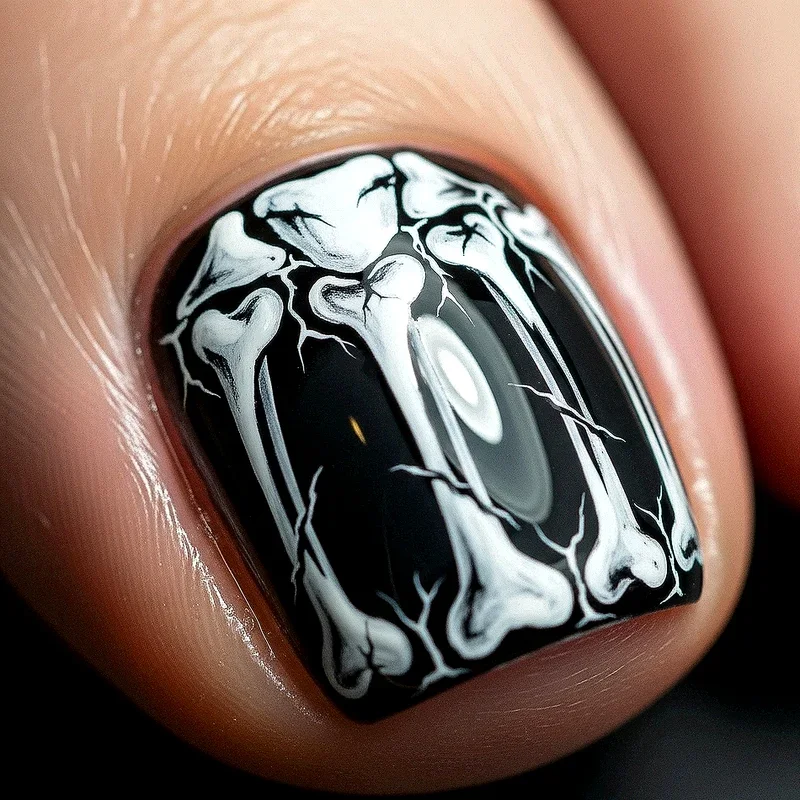
8. Skeleton Bones Pattern
Get ready to rattle some bones with this anatomically playful design that turns your toes into tiny x-rays. Paint a solid black base to represent the darkness, then use white polish to create simple bone shapes like femurs, ribs, or skull fragments on each nail. The key is keeping the bone designs simple yet recognizable since you're working with limited space on toe nails. You can connect bones across multiple toes to create a fuller skeleton effect or keep each nail independent with different bone types. Adding a touch of gray shading gives the bones more dimension and realism. This design works especially well for skeleton costumes or Day of the Dead celebrations.
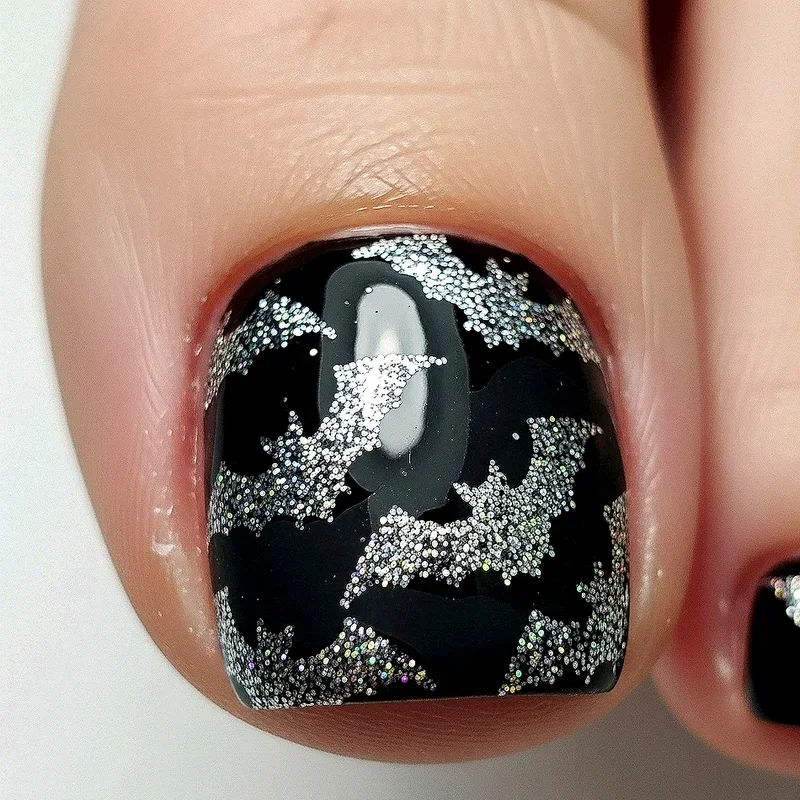
9. Glittery Bat Silhouettes
Let your toes take flight with these sparkling bat silhouettes that combine Halloween spookiness with glamorous glitter. Start with a deep purple or midnight blue base, then apply black bat silhouettes using nail stickers or freehand painting for the more artistically inclined. The magic happens when you outline or fill these bats with black glitter polish, creating a textured effect that catches the light beautifully. Vary the size and position of the bats across your toes, having some in full flight and others perched for visual variety. Consider adding a full moon on your big toe using silver or white polish as a backdrop for your bat colony. This design perfectly balances gothic elegance.
10. Mummy Wrap Design
Unwrap some serious style with this mummy-inspired design that's surprisingly easy to achieve yet looks incredibly detailed. Begin with a white or off-white base coat, then use a thin brush to create crisscrossing bandage lines with a slightly darker beige or gray polish. The randomness of the wrap pattern is what makes this design authentic, so don't worry about perfect lines or spacing. Add two small black dots or googly eye nail stickers peeking through the bandages on your big toes for that classic mummy look. For extra texture, try using a matte top coat on the bandages while keeping the eyes glossy. This playful design brings ancient Egyptian horror to life.

11. Evil Eye Collection
Ward off bad vibes while embracing Halloween spirit with this collection of evil eyes staring from each toe. Create different colored irises on each nail using blues, greens, browns, and even red for a supernatural twist. Start with white oval shapes as the eye base, add the colored iris, then a black pupil, and finish with tiny white dots for light reflection. The unsettling effect comes from having all these eyes looking in slightly different directions, creating an eerie watched feeling. Add red veins using a thin brush for extra creepiness, or incorporate glitter into the irises for a more mystical appearance. This unique design definitely starts conversations and works perfectly for fortune teller costumes.
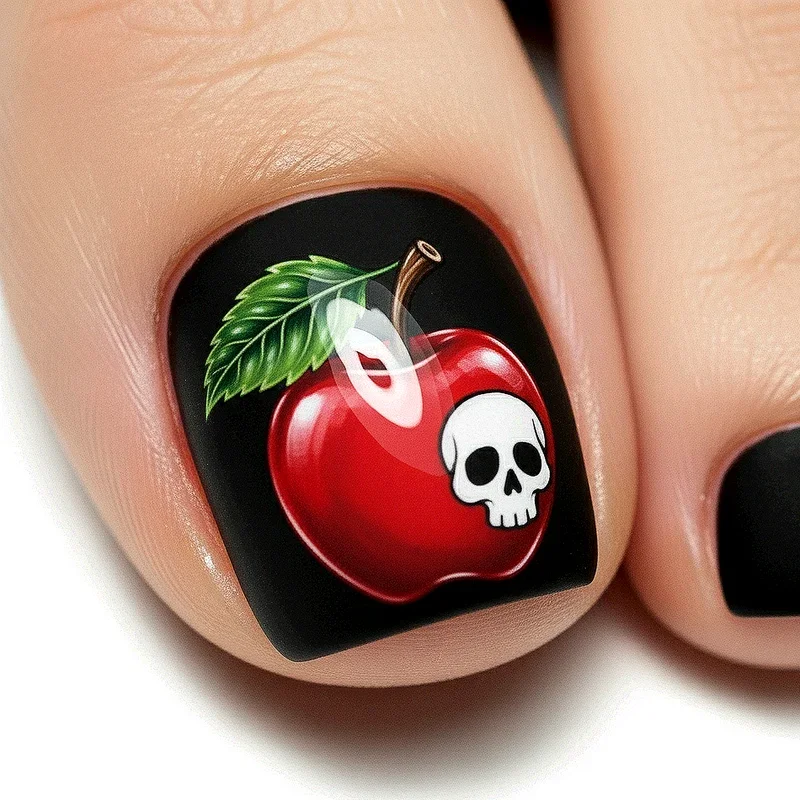
12. Poison Apple Art
Take a bite out of style with these wickedly beautiful poison apple designs inspired by fairy tale villainy. Paint your nails in deep, glossy red to represent the apple's skin, then add a small black or dark purple drip from the top to suggest poison. Create tiny white highlight spots to give that fresh apple shine, and perhaps add a small green leaf at the base. For your big toes, consider adding a tiny skull symbol or the word "poison" in miniature gothic lettering. The contrast between the beautiful red apple and the sinister poison element perfectly captures Halloween's mix of beauty and danger. This design especially suits those channeling their inner evil queen.
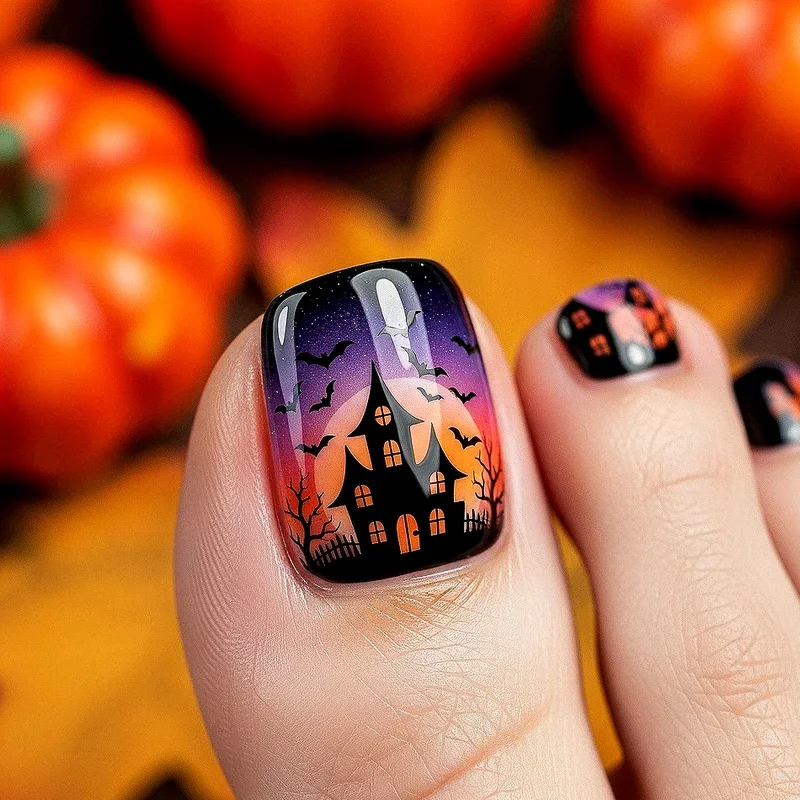
13. Haunted House Silhouette
Transform your toes into a spooky neighborhood with these haunted house silhouettes against dramatic sunset backgrounds. Start by creating an orange to purple gradient base that mimics a Halloween sunset, then use black polish to paint simple house shapes with crooked chimneys and pointed roofs. Add yellow squares for lit windows and maybe a tiny witch or bat flying past for extra atmosphere. The beauty lies in making each house slightly different, creating a whole haunted street across your ten toes. Use a thin brush to add bare tree branches or a picket fence for additional detail. This artistic design tells a story and showcases your creative skills while capturing Halloween atmosphere.
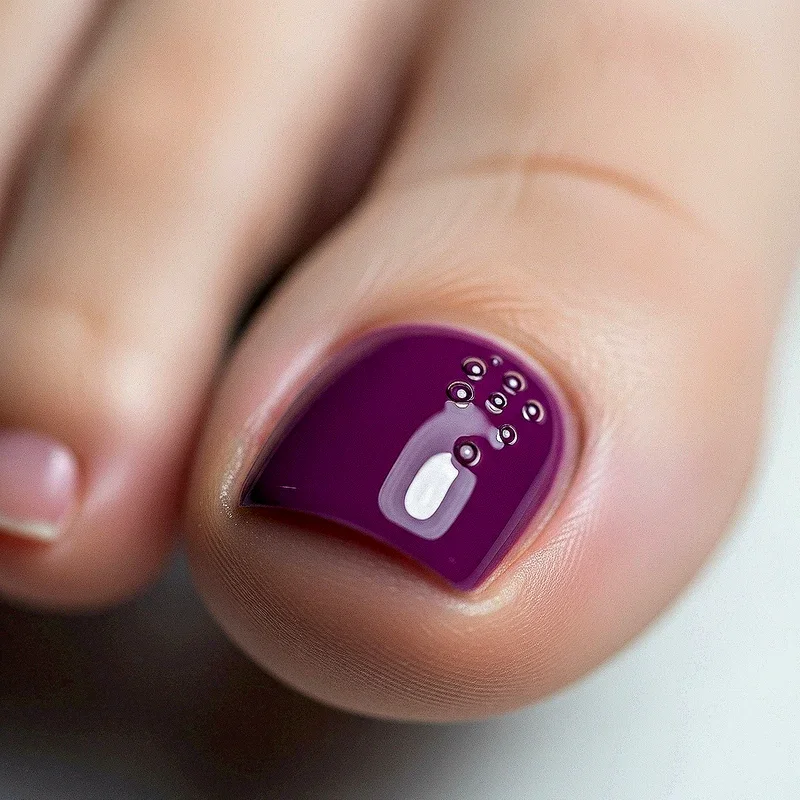
14. Purple Potion Bubbles
Brew up some magic with this bubbling potion design that looks like it came straight from a witch's cauldron. Use various shades of purple from deep plum to light lavender as your base, then create bubble effects using a dotting tool with lighter purple and white polish. The key is overlapping circles of different sizes to create depth and movement, making it look like your nails are actually bubbling. Add touches of green or pink for a more mystical potion effect, and consider incorporating fine glitter to represent magical sparkles. Top it off with a glossy coat to enhance that liquid appearance. This whimsical design perfectly captures the magical side of Halloween celebrations.
15. Creepy Crawly Spiders
Arachnophobes beware because these realistic spider designs will have everyone doing double takes at your terrifyingly beautiful toes. Start with a neutral base like nude or light gray, then paint small black spider bodies using a dotting tool on each nail. The real artistry comes in adding those eight delicate legs extending from each body, which requires a steady hand and thin brush. Vary the positions and sizes of your spiders, having some crawling up and others dangling from web threads. For your big toes, create a larger, more detailed spider complete with red markings for a black widow effect. This design showcases your nail art skills and Halloween dedication perfectly.
Conclusion
These fifteen Halloween toe nail designs offer something for every style preference and skill level. From simple color combinations to intricate artistic creations, your toes can become tiny canvases for Halloween creativity. Remember, the best part about toe nail art is its longevity compared to fingernails, letting you enjoy your spooky designs throughout the entire Halloween season. So grab your favorite polishes, channel your inner artist, and give your toes the frightfully fabulous makeover they deserve this October.
Read next: 15 Flower Nail Ideas for a Fresh and Feminine Look
Frequently Asked Questions
Q1: How long do Halloween toe nail designs typically last?
A: With proper base and top coat, designs last two to three weeks.
Q2: Can I create these designs without professional nail art tools?
A: Yes, toothpicks and bobby pins work as great DIY nail art tools.
Q3: Which design works best for beginners?
A: The Classic Orange and Black Ombre requires minimal artistic skill needed.
Q4: Should I match my toe and fingernail Halloween designs?
A: Matching creates cohesion, but mixing designs adds more creative visual interest.
Q5: What's the best way to remove glitter Halloween nail polish?
A: Soak cotton pads in remover, place on nails, wrap with foil.
Stay up to date with our latest ideas!